Getting started with n0nx0x2 and x0xlarge
| The original article from 2016 "Getting started with n0nx0x2 and x0xlarge" was replaced with this article so that it matches the printed manual that comes with the x0xlarge 2020 edition. Keep in mind that removing the memory chip should not be done on older versions of the x0xlarge, as this is unique for the 2020 edition by Anton Savov. The other info on this page is the most recent and accurate for all versions of x0xlarge. |
Congratulations..
You have purchased a x0xlarge 2020 edition! ☺
The x0xlarge is a CPU expansion board for the Adafruit x0xb0x, offering 16 times more flash storage, 8 times more ram, 8 times bigger EEPROM, PWM, 8 channel 10 bit A/D converter, ISP connector, Midi SysEx firmware upgrades and loads of spare pins.
| Please follow the provided instructions carefully, as failure to do so may cause damage to your x0xb0x and/or the x0xlarge. Even if you have prior experience with the x0xlarge, the 2020 edition is significantly different due to the FRAM memory! |
What’s new:
Functional changes:
-
removed JTAG interface
Redrawn from scratch using open source EDA tool (KiCAD), with the following improvements:
-
reduced component sizes
-
optimised for DIY assembly
-
conform AVR MCU hardware design best practices
-
improved signal routing for reducing noise and interference
Installation tools:
-
1 Phillips screwdriver
-
1 or 2 flat head screwdrivers to help remove the original CPU
Backup and conversion of old patterns
The new x0xlarge comes pre-loaded with n0nx0x2 and some well-known acid patterns, so it’s ready to use.
However, if you wish to keep your old patterns, you need to back them up first using c0nb0x, so they can be converted (n0nx0x2 uses a different format) and restored after installation. Be aware that this conversion is lossy: x0xb0x firmware allows "double octave up" on notes, making patterns span 4 octaves. This feature was not available on the original TB-303 and also not in n0nx0x2, so as a result some of your patterns might not sound the same as before. (UPDATE: There’s a special version of the n0nx0x2 firmware available here that retains the "double up" behavior if this is important to you.)
Get c0nb0x:
| Yeah, these tools are showing their age and maybe some people will need to grab an older computer to get it to work, sorry for this, we’re thinking about ways to make this more future proof, if you need any assistance with the conversion you can find us on IRC (#x0xb0x on Libera.Chat, we’re happy to help). |
Keep in mind that connecting the x0xb0x to your computer via the USB port requires a working USB-serial chip inside the x0xb0x, and installation of the required FTDI drivers on your computer. You can check the serial connection in c0nb0x settings.
Open c0nb0x, select Connect to the firmware to export your patterns.
After installation of the x0xlarge (with n0nx0x2), you can re- import your patterns as following:
-
Connect to firmware
-
Import patterns (I)
-
Ignore "Expected OSID 23, but CXM is (1)adafruit/sokkos2" (I)
-
Tap Y to convert the patterns
Mandatory EEPROM removal
| Skip this procedure if you have an older, pre 2020 x0xlarge. |
As mentioned before, a new feature of the x0xlarge 2020 is that it has onboard FRAM memory. This is an alternative for the EEPROM memory used in the x0xb0x. The FRAM has a much higher lifetime and also offers better performance. It is of utmost importance that the original EEPROM is removed from the x0xb0x main board.
| If you do not remove the EEPROM, plugging in the x0xlarge will cause a short-circuit that can possibly damage both the original EEPROM and the x0xlarge. |
Opening the case
Place the x0xb0x upside down on a table. It is advised to use a soft fabric underneath. There are 4 Phillips screws on the back to remove, indicated with red circles on the drawing below, go ahead and remove them:
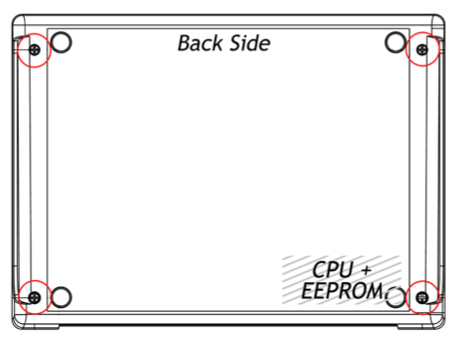
Slide the bottom of the case up to reveal the insides. From this point on, make sure you take precautions to avoid static electricity discharges, as these can cause harm to the electronics.
Remove the EEPROM and CPU
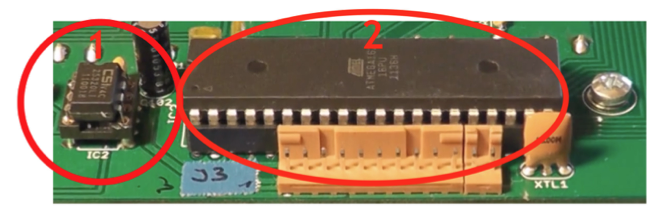
The EEPROM (1) is the 8-PIN DIP chip labeled IC2, located next to the CPU. This chip should be socketed (*). Squeeze the chip at the ends between thumb and index finger and pull upwards. You can use a flat screwdriver as a hinge if needed.
| (*) In the unlikely case that the EEPROM is soldered to the circuit board, the easiest way to get rid of it is gently cutting the legs one by one using flat trimming pliers, until the chip can be removed. Make sure the remains of the pins do not cause a short. One rare (unofficial and closed source) variation of the x0xb0x mainboard uses a soldered SMD EEPROM. Please contact [email protected] if that is the case. |
The CPU (2) is the 40-PIN DIP chip. This chip should be socketed (*). Due to the size of the chip, just "pulling it out" will probably not work or bend/break the pins. One method is to use two flat head screwdrivers: place the flat end between the microcontroller and the socket on both ends and gently use them as a hinge to push it up and out of the socket.
| (*) Although this is very unlikely to happen, due to the DIY nature of the x0xb0x there may exist some in the world that have a soldered microprocessor. In that case it is advised to contact a qualified technician to professionally remove the old CPU and place a 40-pin DIL socket instead. |
x0xlarge installation
Slide the x0xlarge 2020 out of it’s packaging and place it onto the socket. Play careful attention to the alignment of the pins on all sides. Once aligned properly, press the x0xlarge down firmly into the socket, keeping equal pressure on both ends.
| Considering the removed components might be of use later, store them safely in the x0xlarge box. |